Next.js + TypeScript
The customer interface, upload flow, account area and server routes.
Start with a website and product image. Finish with one consistent character, three scenes, a 30-second script, A-roll, B-roll and a first edit.
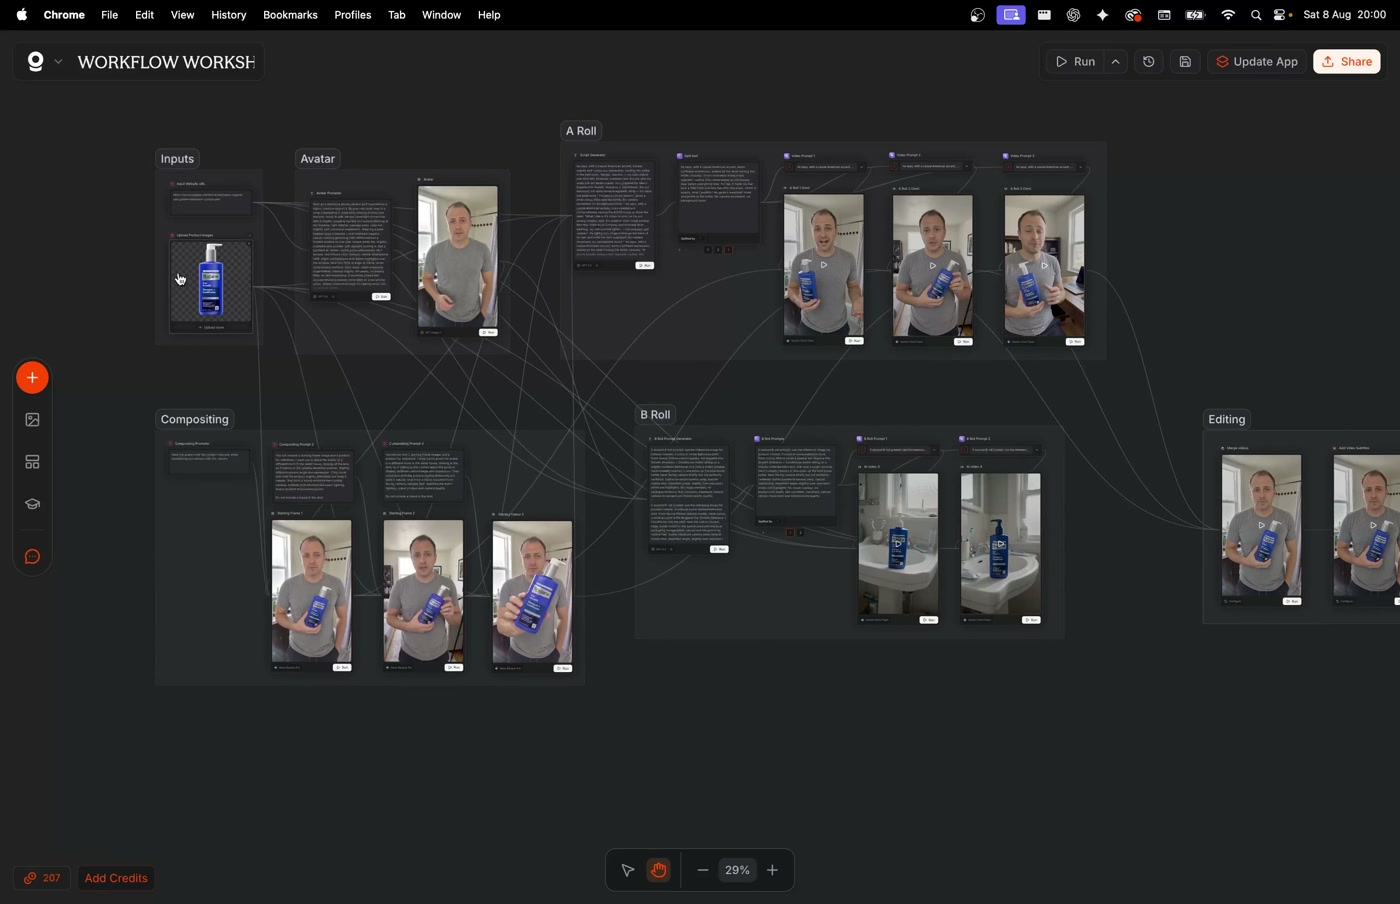
We are going to build one working AI UGC workflow together. Put in a product website and a clean product image. Out the other side, you should have one believable person in three scenes, a 30-second script, three talking clips, two useful B-roll shots and a first edit.
This is a follow-along manual. Keep Pletor open in another window and build as you read. I have put the action list at the top of each step. Use the explanation, screenshot and copyable prompt underneath when you need them. Then check the result before moving on. If the first image is wrong, the video will not magically fix it.
You can open my finished V2 workflow to inspect the connections. Build yours on a blank canvas the first time. That is how the nodes actually start to make sense.
Every screenshot and node name in this manual comes from Pletor. It is the tool I learned on, and its Upload Images node keeps the product reference connected when you change the product later. You can build the same logic elsewhere, but following this version in the same tool will be easier.
One practical rule before we start: name each node by its job and number. When the canvas gets busy, select a node and read its Inputs panel. It is much quicker than trying to trace every wire by eye.
Right. Let’s build it.
Write down what goes in and what should come out.
Before you touch the canvas, decide what a person will give the workflow and what they should get back. Keep it brutally simple: Facebook URL in, ten new ads out. Or website URL in, talking-head avatar out.
This example is deliberately a little complicated. I want to show you the power of a proper workflow and teach the nodes that matter most, including Text Box, Upload Images, Generate Text, Generate Image, Generate Video, Split Text and List Selector. You might not need this exact machine today. If you build it step by step, you will understand the pieces needed to build the machine you do need.
For this build, we are putting in a website URL and a clean product image. We want one believable character, three scenes, a 30-second script, three A-roll clips, two B-roll shots and a review edit out the other side.
Inputs also decide how much control the user gets. We will infer the avatar from the website, but imagine you are building an app that lets somebody choose hair colour and gender. Add a Text Box for each preference, connect both to the Avatar Prompter and tell the LLM to treat those inputs as priority before it executes the remaining instructions.
If you want to inspect the finished routing while you build, open either workflow below. V1 is the original course build. V2 is the updated version I kept improving as I tested it.
Instruction pattern: Take any or all supplied preference inputs as priority, then execute the remaining prompt.
You can explain the workflow in one sentence before adding a node.
Add the two inputs that every later branch will use.
Open a blank canvas. In Pletor, right-click anywhere or use Add Node. Add a Text Box for the website URL and an Upload Product Images node for the clean product reference.
Label every node as you add it. When you select a node, its Inputs panel shows exactly what is feeding it. Use that panel instead of trying to trace a wire across the whole canvas.
Paste the website URL as plain text using Ctrl + Shift + V on Windows or Command + Shift + V on Mac. I learned this after a men's Rogaine page somehow produced a woman. I never got a satisfying technical explanation, but pasting the link as plain text fixed the problem.
You can upload more than one product image when the model needs extra angles or label detail. You can also add the preference Text Boxes we discussed in Step 1. For convenience, select the input nodes and group them as Inputs. Grouping is optional, but it makes the board much easier to move and inspect.
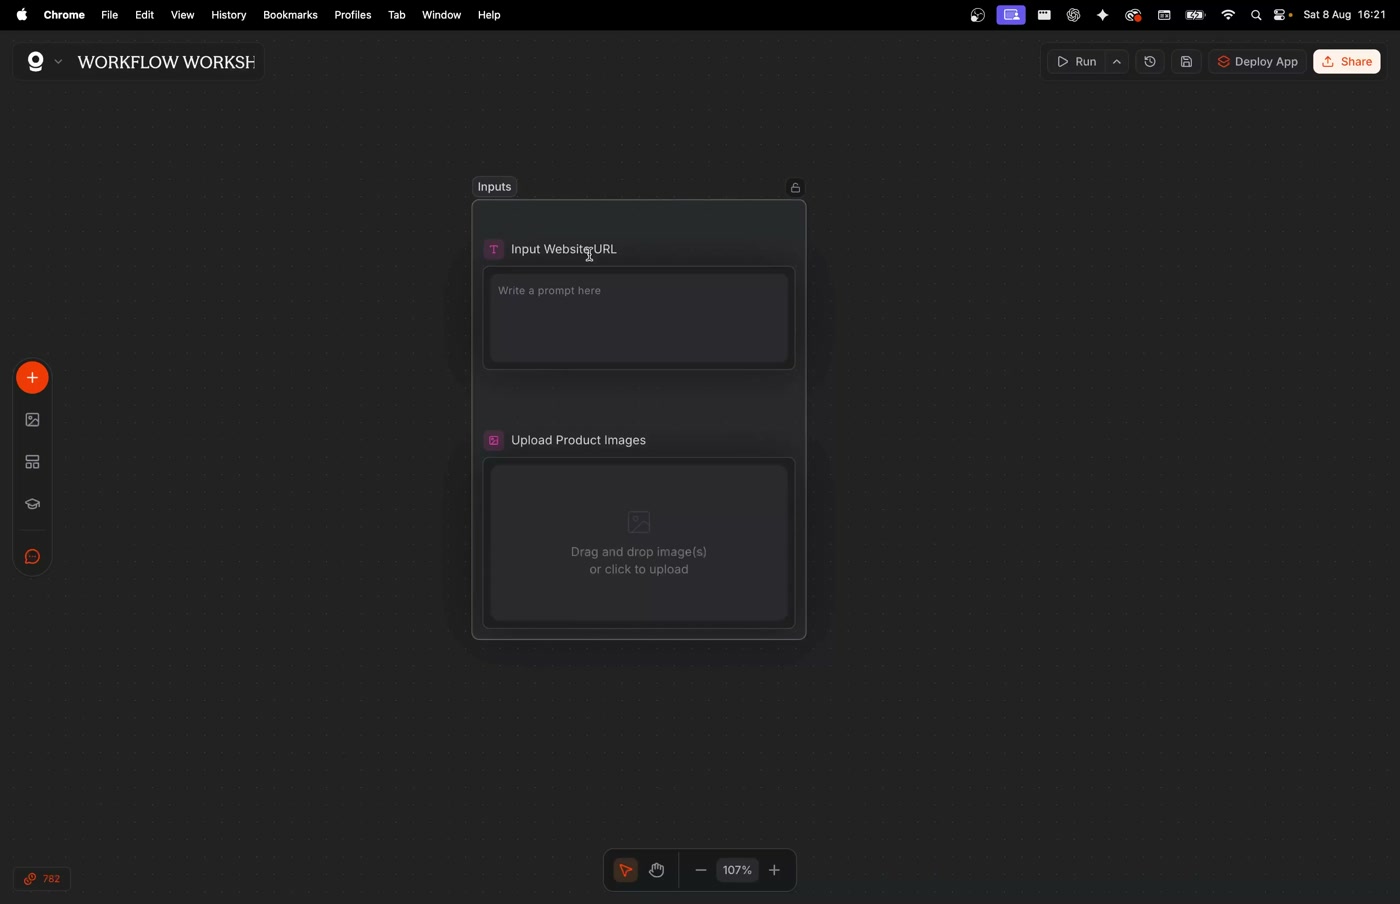
The URL and product image are in separate, clearly named nodes.
Make one believable person without the product.
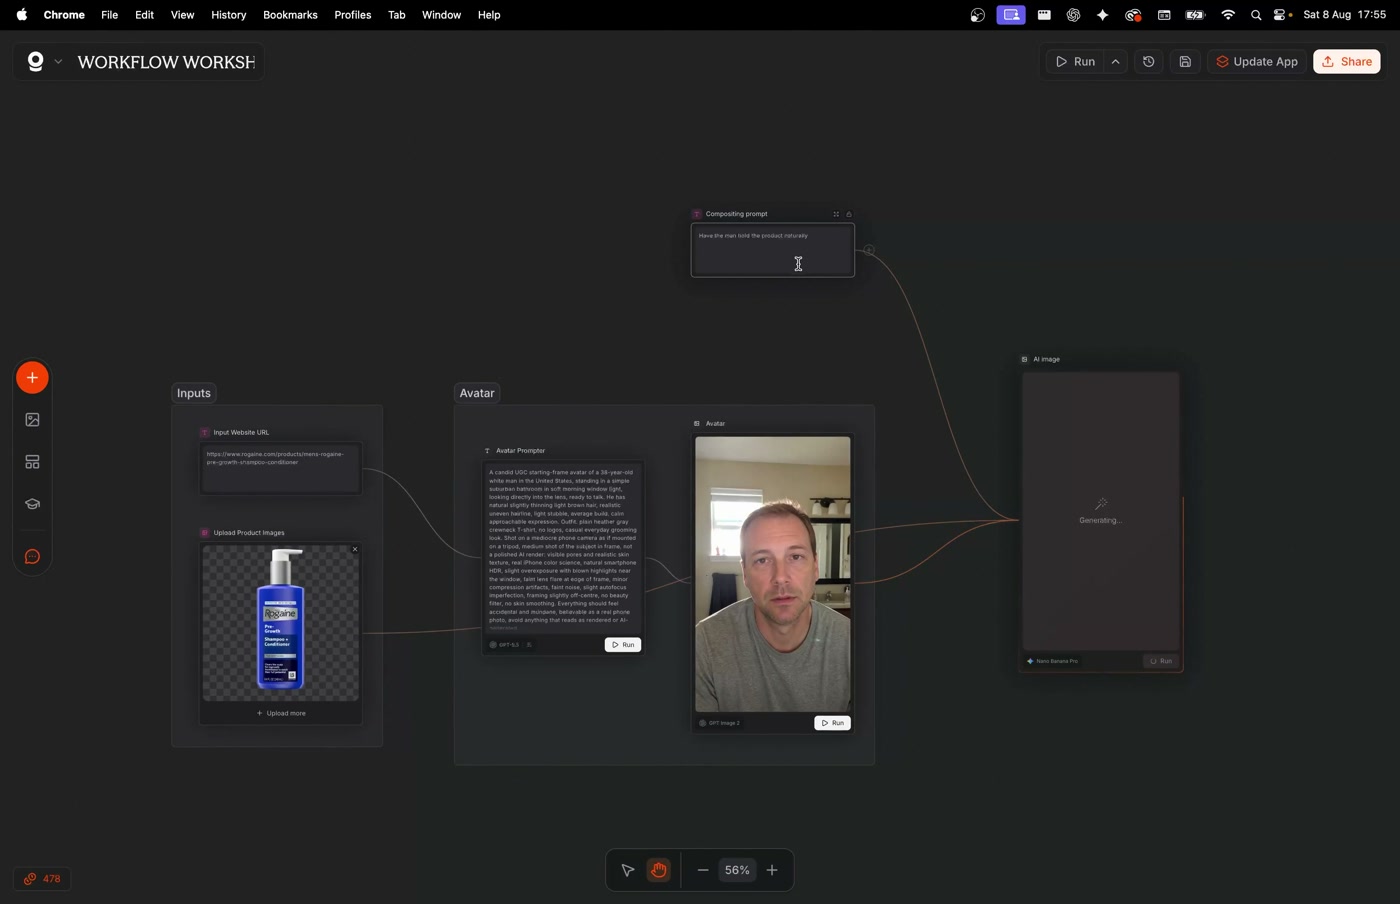
The first generated part of the workflow is the person who will carry the advert. Drag from Input Website URL into Generate Text, turn on web search and name the node Avatar Prompter.
I recommend GPT-5.5 for this job. That is my recommendation, not a rule. If you want, duplicate the Avatar Prompter node and split-test the available text models using exactly the same inputs and prompt. I do this a lot. Keep the model that reads the page and follows the output format most reliably.
For now, do not connect the product image. First approve the identity, room, clothing and rough phone-camera look. Then add the real product in the next step. Separating those decisions gives you much more control.
I already explain how to prompt in my prompting ebook, and that guide is comprehensive, so I am not going to waste your time repeating it here. For now, use the copy-and-paste Website to Avatar prompt below and pay attention to what is being automated.
If you added inputs such as Hair Colour or Gender, connect them to Avatar Prompter too. The prompt tells the LLM to treat those choices as priority instead of guessing from the website.
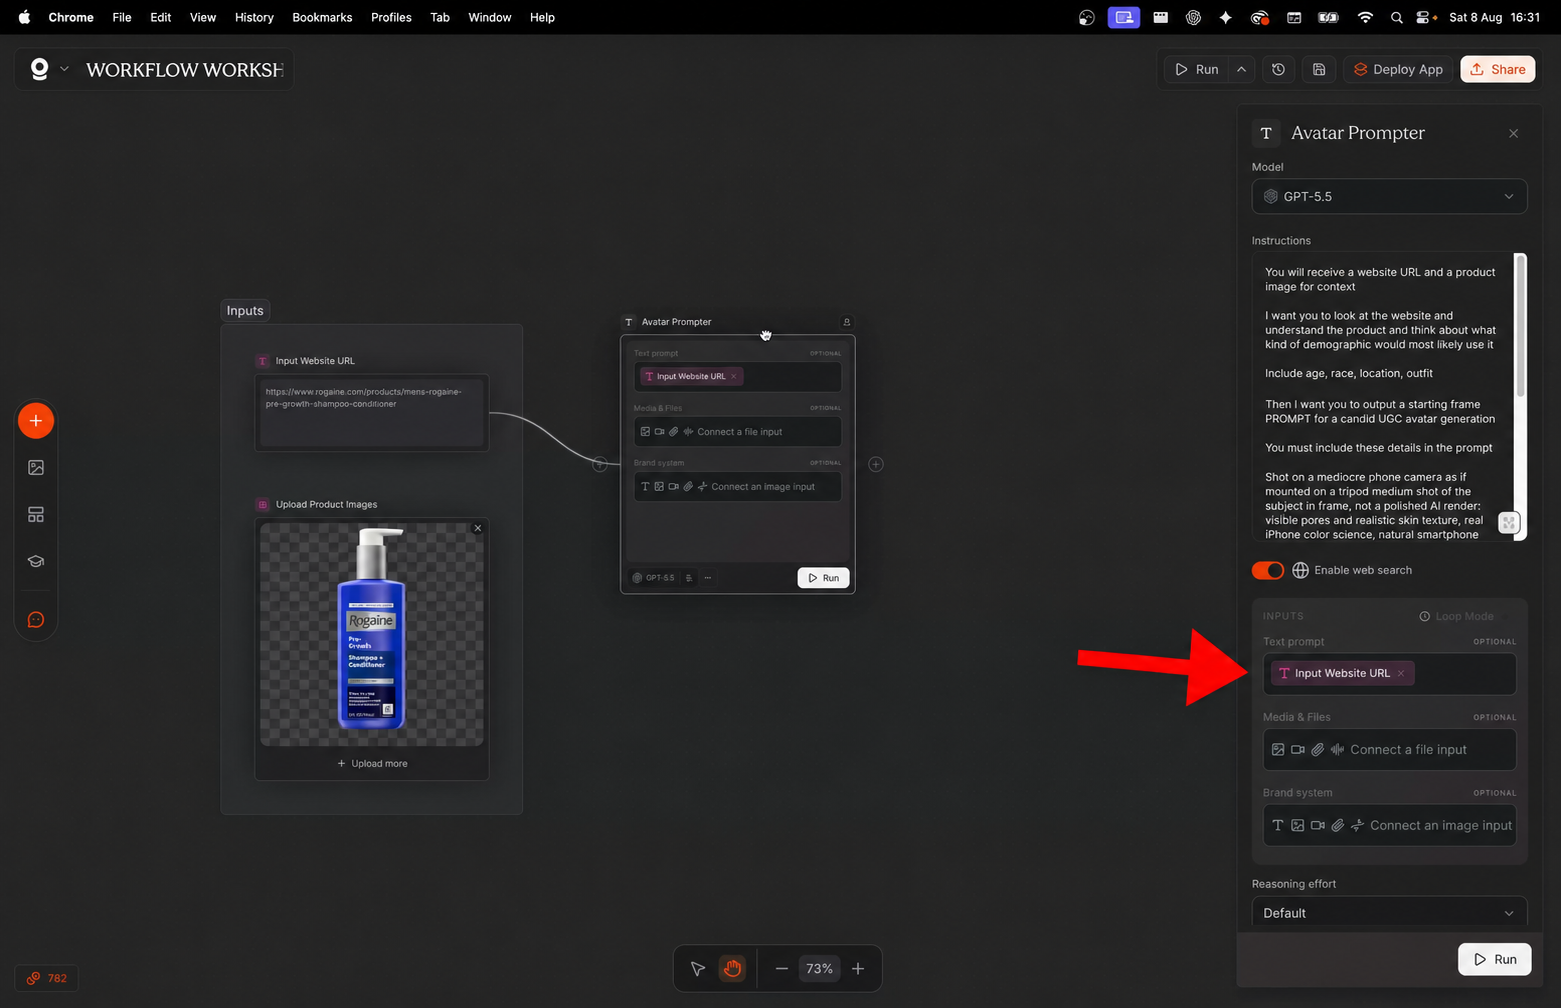
You will receive a website URL and may receive additional user preference inputs.

If additional preference inputs are supplied, treat them as priority. Use the website to fill in only the details the user has not specified.

Use the website to understand the product and identify the kind of person most likely to use it. Choose a plausible age, gender, ethnicity, location, outfit and everyday environment for that customer.

Output one complete starting-frame prompt for a candid UGC avatar generation. The avatar should be looking towards the lens, ready to talk to their audience.

The final image prompt must include this visual direction:

Shot on a mediocre phone camera, not a polished AI render: visible pores and realistic skin texture, real iPhone colour science, natural smartphone HDR, slight overexposure with blown highlights near the window, faint lens flare at the edge of frame, minor compression artefacts, faint noise, slight autofocus imperfection, framing slightly off-centre, one-handed grab-shot feel, no beauty filter and no skin smoothing. Everything should feel accidental and mundane, believable as a real phone photo. Avoid anything that reads as rendered or AI-generated.

Critical: produce only a starting-frame avatar. Do not include the product, packaging, brand name or any product information in the image prompt. The product will be composited later.

Output the final image prompt only. No explanation, headings or preamble.
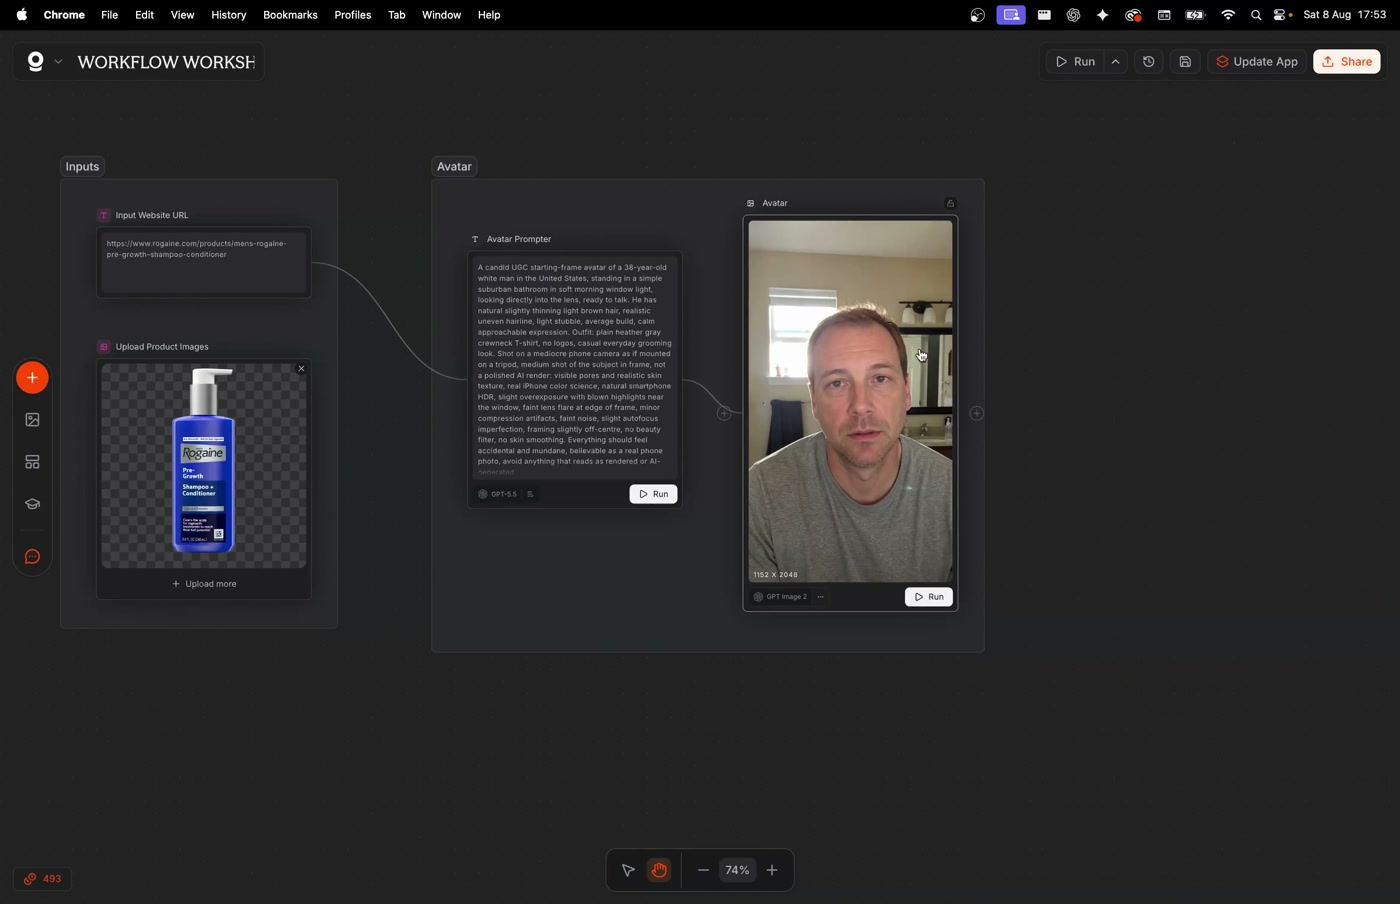
You would accept this person, room and phone-camera look as the start of a real clip.
Put the real product into that approved image.
Now we give the approved avatar the real product. The difficult part is scale. A clean packshot does not tell the image model whether the bottle is six inches tall or the size of a suitcase.
You can ask the LLM to read the website, interpret the real product size and use case, then write that detail into the image instruction. It is slightly overkill, but it is more precise and it demonstrates why a text model can be useful between an input and an image model.
Create a GPT-5.5 Generate Text node called Product Compositing Prompter, enable web search and feed it Input Website URL, Avatar 1 and Product Image. Its output then joins Avatar 1 and Product Image inside a Nano Banana Pro image node called Starting Frame 1.
I use Nano Banana Pro here because sending a GPT Image 2 result back through GPT Image 2 can add another layer of texture. Nano Banana Pro did a better job of preserving the person while changing only the product.
You will receive:
1. A product website URL
2. An approved avatar image
3. A clean product reference image

Read the website and product image to understand the product's real dimensions, proportions, normal use case and how a person would naturally hold it.

Write one complete Nano Banana Pro compositing prompt. Tell the image model to place the supplied product naturally into the approved avatar's hands as if they are talking to the camera about it.

The final compositing prompt must preserve the avatar's exact identity, face, skin, hair, clothes, background, lighting, camera angle, phone-camera texture, image quality and resolution. It must not beautify, relight, restyle, denoise or regenerate the full frame.

It must preserve the product's exact shape, dimensions, proportions, colour, logo and label. Specify a plausible scale, grip and position using the product information from the website. The avatar should hold the product, not use it.

Output the final compositing prompt only. No explanation, headings or preamble.
The face, hands, product size and label all survive the change.
Make a second room without changing the person.
Starting Frame 1 locked the person and product. Now we change the room, pose and expression without changing the identity, outfit or rough phone-camera feel.
I am doing this for two reasons. First, I want to show you how to keep one character consistent while changing a scene. Second, changing locations is a common client request because a new background helps reset attention and improve retention on social media.
Add a Text Box called Scene 2 Location Prompt and duplicate the Starting Frame 1 image node. Name the new output Starting Frame 2. Feed it Starting Frame 1, the original Product Image and Prompt 03A: Scene 2 Location Prompt.
The previous frame protects the person. The original packshot restores clean product detail that may already be too small or blurry in the first scene.
You will receive one approved starting-frame image and a product image for reference.

Place the same avatar in a different room in the same house, looking towards the lens as if talking to the camera about the product. Use a slightly different natural expression, pose and camera angle. The avatar may hold the product slightly differently, but it must remain natural.

Use a medium shot from a stationary front-facing phone camera. Do not include a tripod, phone, interface or recording overlay in the image.

Maintain the avatar's exact identity, face, hair, outfit, product, product label, lighting style, phone-camera quality, colour and texture.
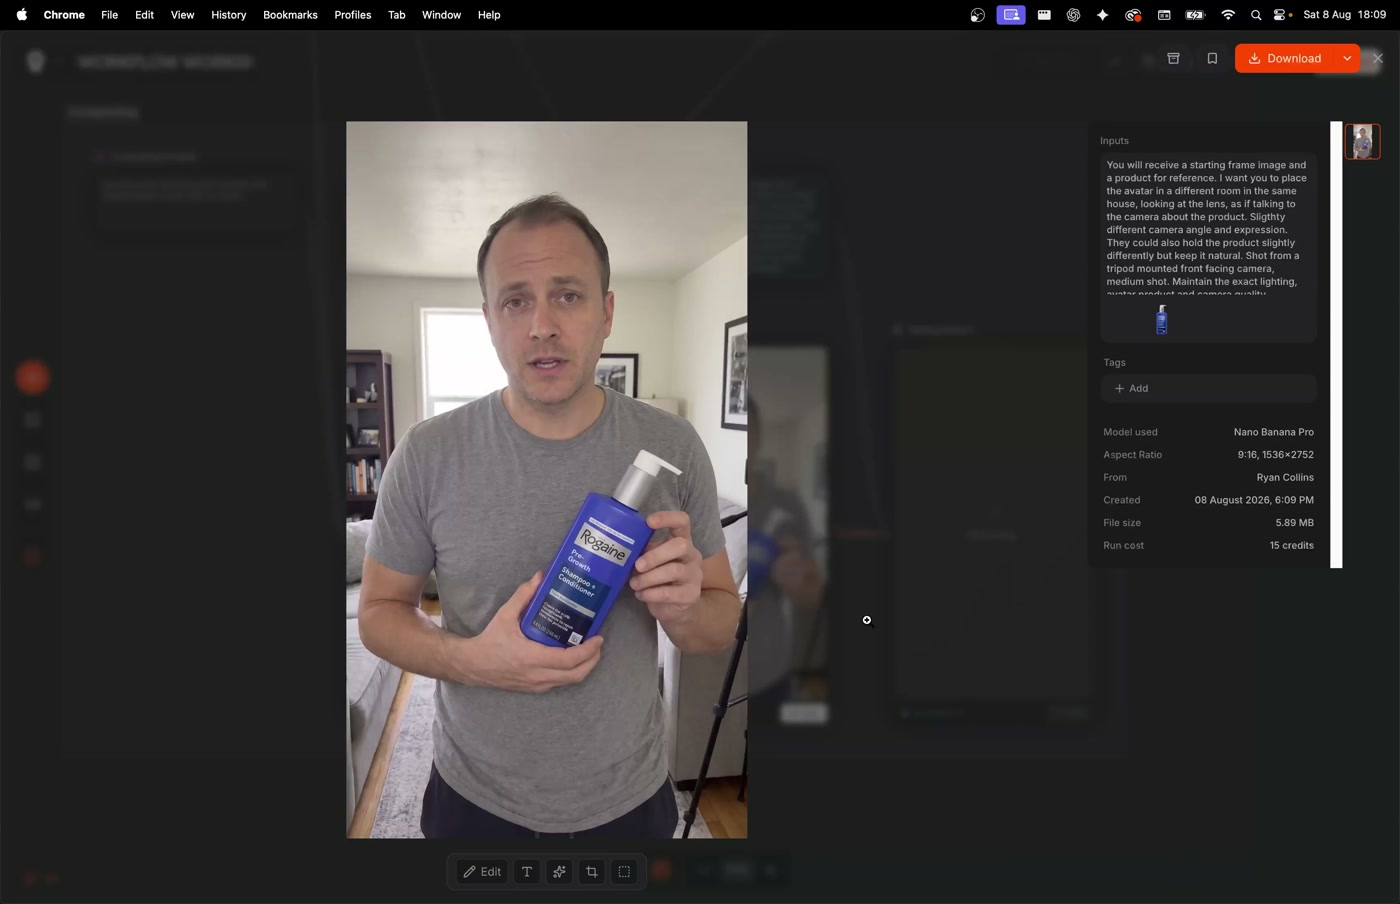
The room is clearly new; the person, clothing and product are still the same.
Make a third scene and compare all three.
You could connect Starting Frame 2 directly to Starting Frame 3 and it would work. I also provide Starting Frame 1 because more approved context gives the image model a clearer picture of what must remain fixed.
The two earlier frames show the same person and product from different poses and rooms. That makes identity consistency easier and also shows the model two locations it should not repeat.
Add a Text Box called Scene 3 Location Prompt, then duplicate Starting Frame 2 and name the new output Starting Frame 3. Connect Starting Frames 1 and 2, the original Product Image and Prompt 03B: Scene 3 Location Prompt.
Wait until Scene 2 is approved before running this branch. A bad frame is still context. It simply teaches the model the wrong lesson.
Scene 2 alone can feed Scene 3. Adding Scene 1 gives the model another approved reference for the same person, product and phone-camera texture.
You will receive two approved starting-frame images and a product image for reference.

Place the same avatar somewhere else in the same house that is clearly different from both supplied rooms. Keep the avatar looking towards the lens as if talking to the camera about the product. Use another slightly different natural expression, pose, product hold and camera angle.

Use a medium shot from a stationary front-facing phone camera. Do not include a tripod, phone, interface or recording overlay in the image.

Maintain the avatar's exact identity, face, hair, outfit, product, product label, lighting style, phone-camera quality, colour and texture.
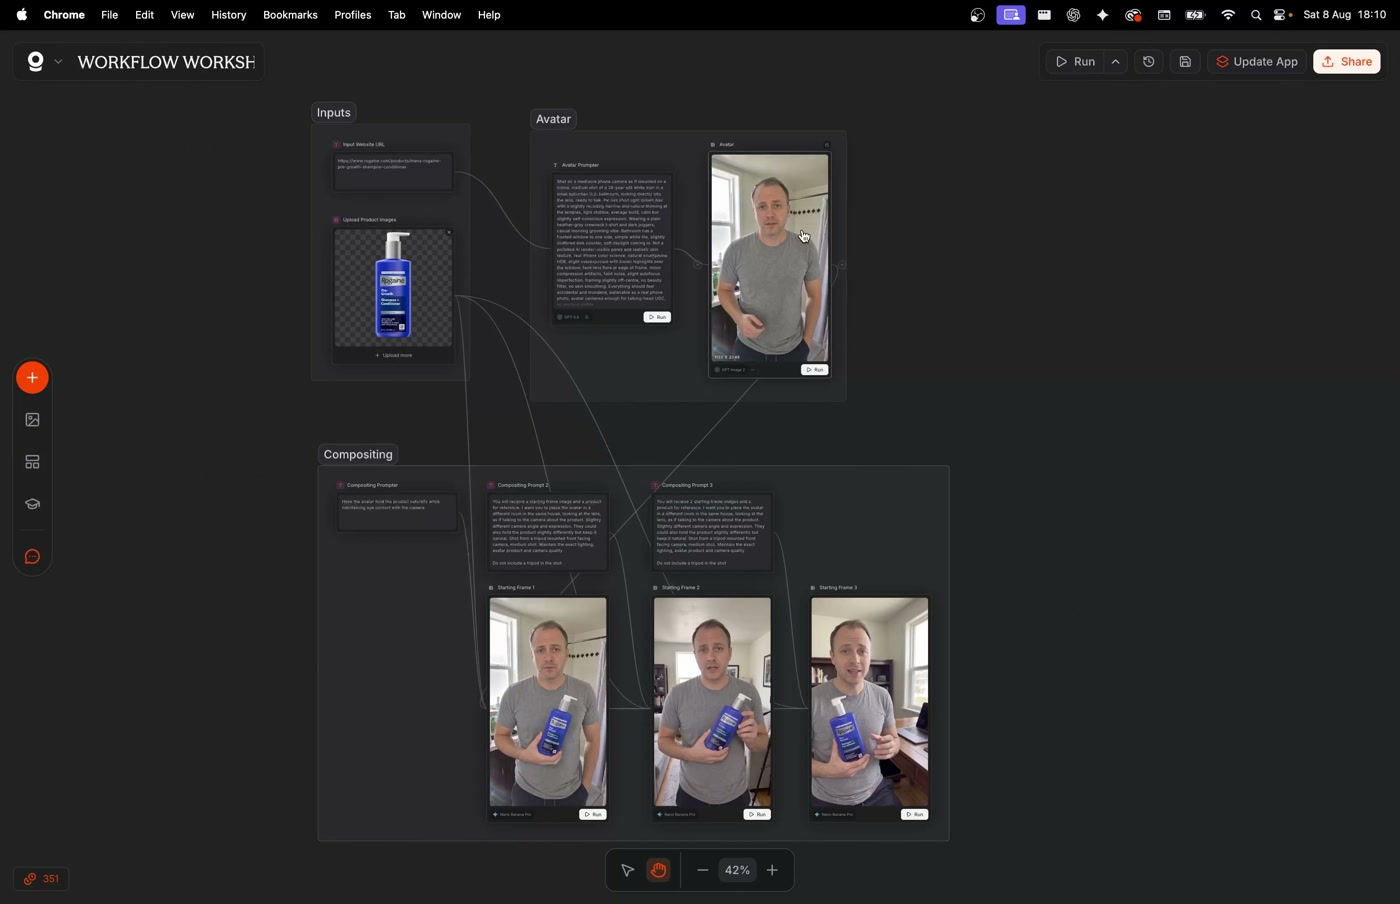
All three frames look like one person filmed on one phone, with the same product.
Write one performance and route its three parts.
This is where it can get slippery, so pay attention.
Imagine you want to take one website URL and create ten Facebook ads. If you run ten separate prompts, you can get the same angle twice. If you ask for ten substantially different angles in one prompt, the model can see the whole set and avoid repeating itself. But then you need a reliable way to extract each result. That is what Split Text and List Selector are for.
In this build we need one coherent 30-second script, split into three parts:
Script 1 + Starting Frame 1Script 2 + Starting Frame 2Script 3 + Starting Frame 3It is the same script written in one pass, then split. That keeps the argument, facts, tone and accent congruent instead of asking three separate writers to invent three adverts.
Create one GPT-5.5 Script Generator, enable web search and feed it the website, product image and all three starting frames. Prompt 04: Three-Part Script Generator uses the caret symbol ^ as a delimiter because that character is unlikely to appear naturally in the script.
Do not connect the unsorted Split Text output directly to all three video nodes. Each List Selector must choose one numbered item.
You will receive a product website URL, a product image and three approved starting frames.

Read the website for accurate product information. Write one candid TikTok or Instagram-style UGC script that can be delivered across three separate clips. The combined spoken duration must be about 30 seconds. Give each section enough dialogue to feel complete, but keep it short enough for a natural delivery in a roughly 10-second clip.

Write from relatable real-world experience rather than listing product facts. Avoid a polished testimonial, generic brand language, a formal introduction or a hard sell. The speaker should sound as if they are working out what to say while talking to the audience.

Use each corresponding starting frame only as visual context for that section. Add one or two small expressions or gestures where they would naturally occur. Do not invent an action that is impossible from the frame.

Choose one plausible broad regional accent based on the character and context. Use exactly the same accent in all three sections.

Finish every section with the chosen accent, no background music and no camera movement.

Separate the three final video prompts using this exact delimiter:
^

Output the three prompts only. No explanation, headings or preamble.
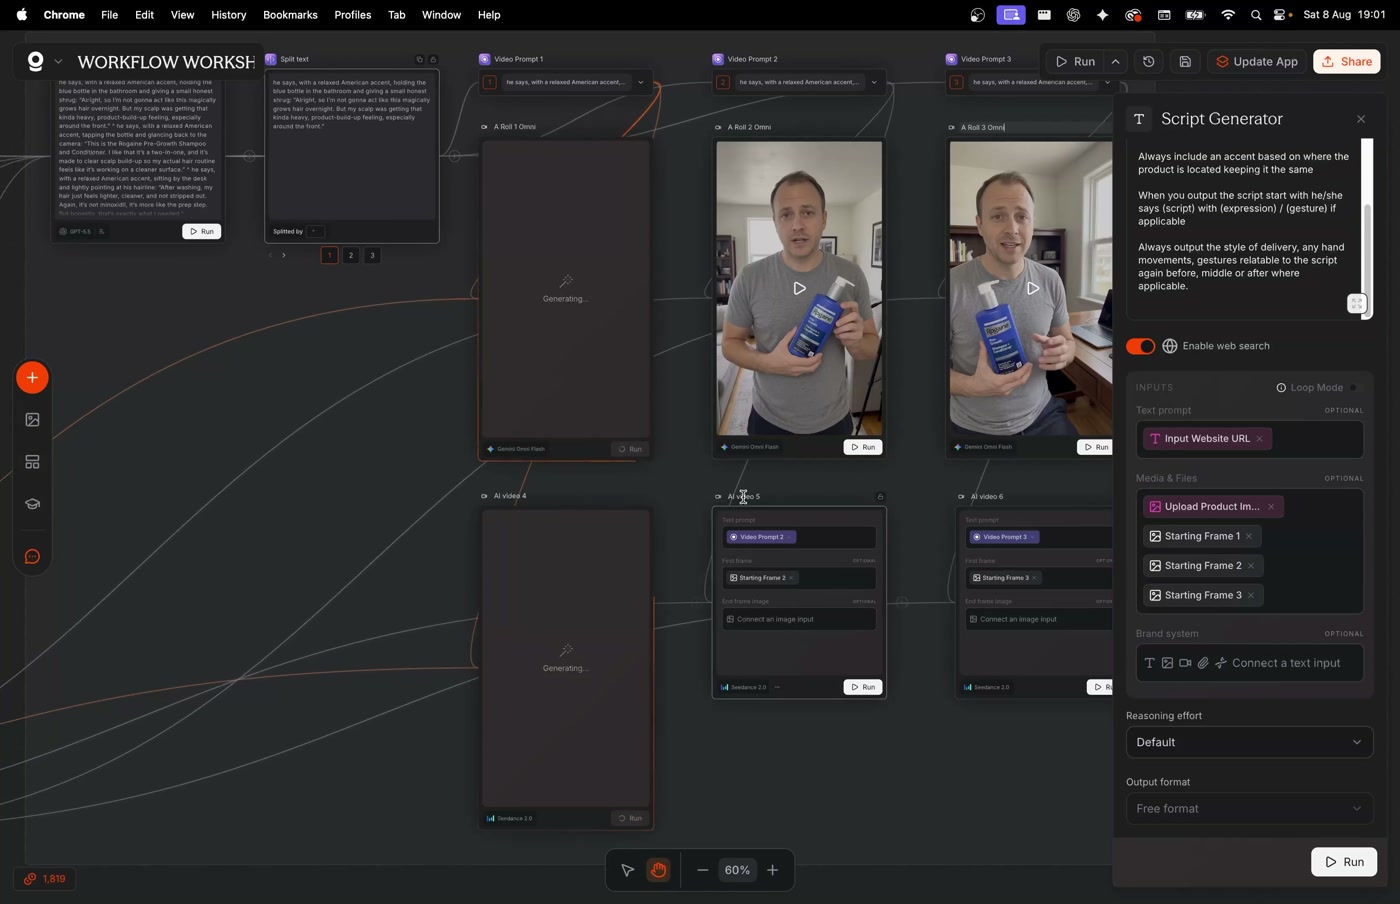
Each numbered video prompt matches its frame and the voice stays consistent.
Test the first talking clip before generating the others.
Video is where the credits start disappearing, so prove one branch before you release all three. Connect Video Prompt 1 and Starting Frame 1 to a Generate Video node called A-Roll 1. Use First frame mode, 9:16 and enough time for the spoken section. Ten seconds is the safe starting point.
I tested Google Omni and Seedance 2.0 against the same frames and prompts. Omni was faster, cheaper and often more candid. It can skip a word when the script is too long, and teeth can occasionally look odd. Seedance was slower and more expensive, but it sometimes followed the dialogue more accurately. Test the models on the same inputs and keep the output you prefer.
Once A-Roll 1 works repeatedly, duplicate the configured node twice. Remove the copied inputs before reconnecting them. Then pair Video Prompt 2 with Starting Frame 2 and Video Prompt 3 with Starting Frame 3.
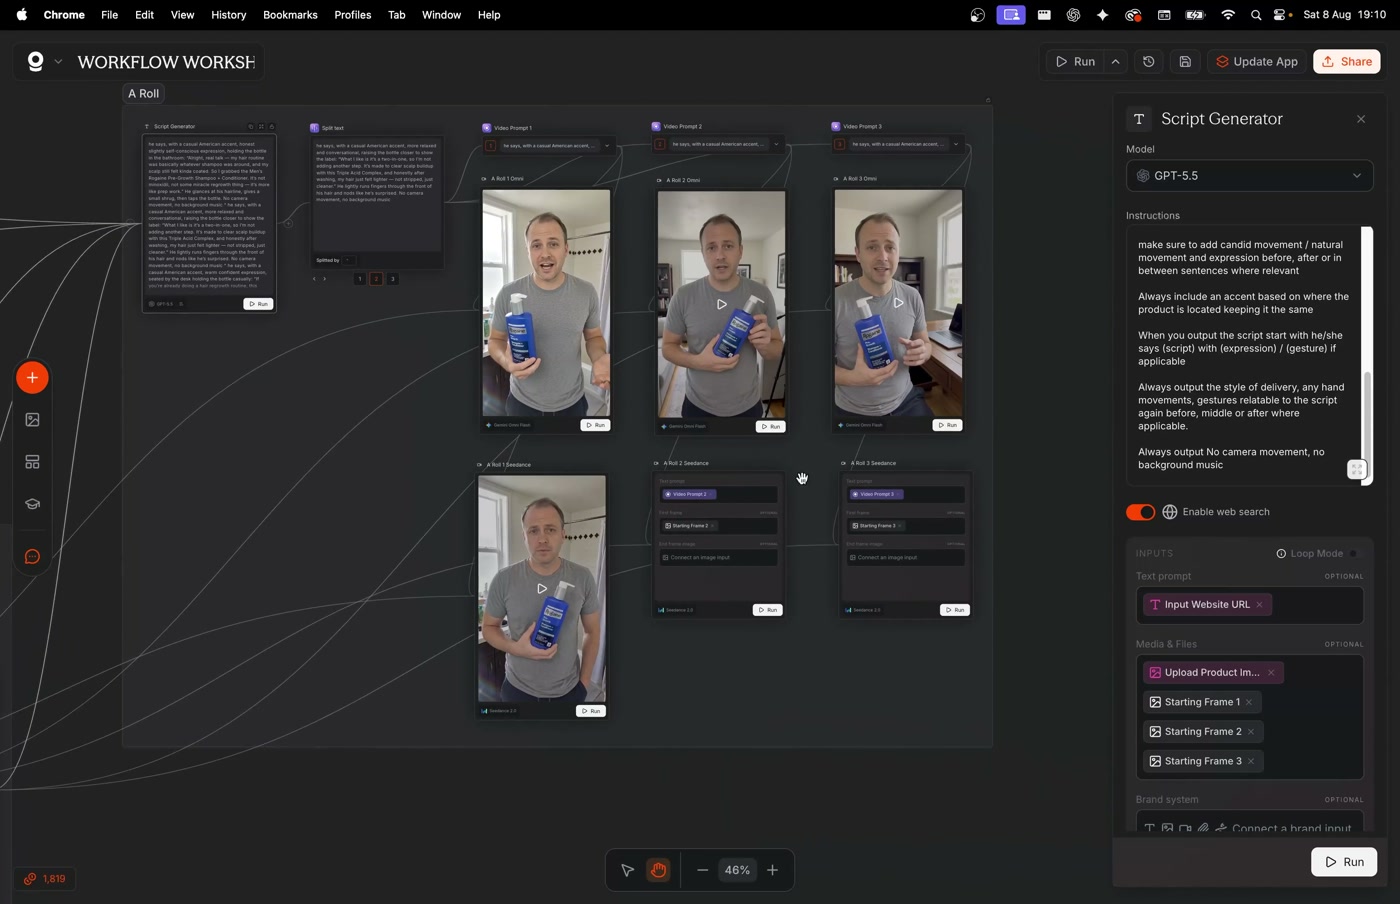
The first clip says the words naturally and keeps the person and product intact.
Add two B-roll shots that give the edit somewhere useful to cut.
A-roll carries the message. B-roll gives you somewhere useful to cut when the viewer has been staring at the same talking head for too long. The important word is useful. Two slightly different product spins are not two ideas.
Create a GPT-5.5 B-Roll Prompt Generator, enable web search and connect Input Website URL and Product Image. You can add an approved frame for room and camera context, but it is optional.
The copy-and-paste prompt below asks for two different shots. It uses the same caret, Split Text and numbered List Selector pattern you just learned. Read the prompt first, then compare it with the generated example.
Start with the cleanest packshot you can find. The course test used a fairly artificial image and both models occasionally damaged the label. That is a model limitation, not a routing problem. Compare models using the same prompt and product before deciding which one works best.
You will receive:
1. A product website URL
2. A product reference image
3. An optional approved A-roll frame for camera and environment context

Read the website and create exactly two substantially different 9:16 B-roll video prompts for the product.

Each shot must have a different job, for example:
- a close product-detail or interaction shot
- a wider day-in-the-life product shot

Use the supplied product reference. Preserve the product's proportions, colour, logo and label.

Make the footage feel like candid cellphone UGC recorded at home. Use natural phone-camera quality, auto-exposure, slightly blown highlights, minor compression, realistic motion and an imperfect handheld or casually placed camera.

Use the A-roll frame only as context for the environment, exposure, texture and general styling. Do not include the avatar unless a prompt explicitly asks for a hand or partial body interaction.

Avoid glossy studio lighting and polished commercial product cinematography. Keep the result natural rather than cinematic.

Do not add titles, captions, interface elements or other visual overlays. Use no background music.

Keep the product likeness exactly the same throughout each shot.

Separate every final prompt using this exact delimiter:
^

Output the prompts only. No explanation, headings or preamble.
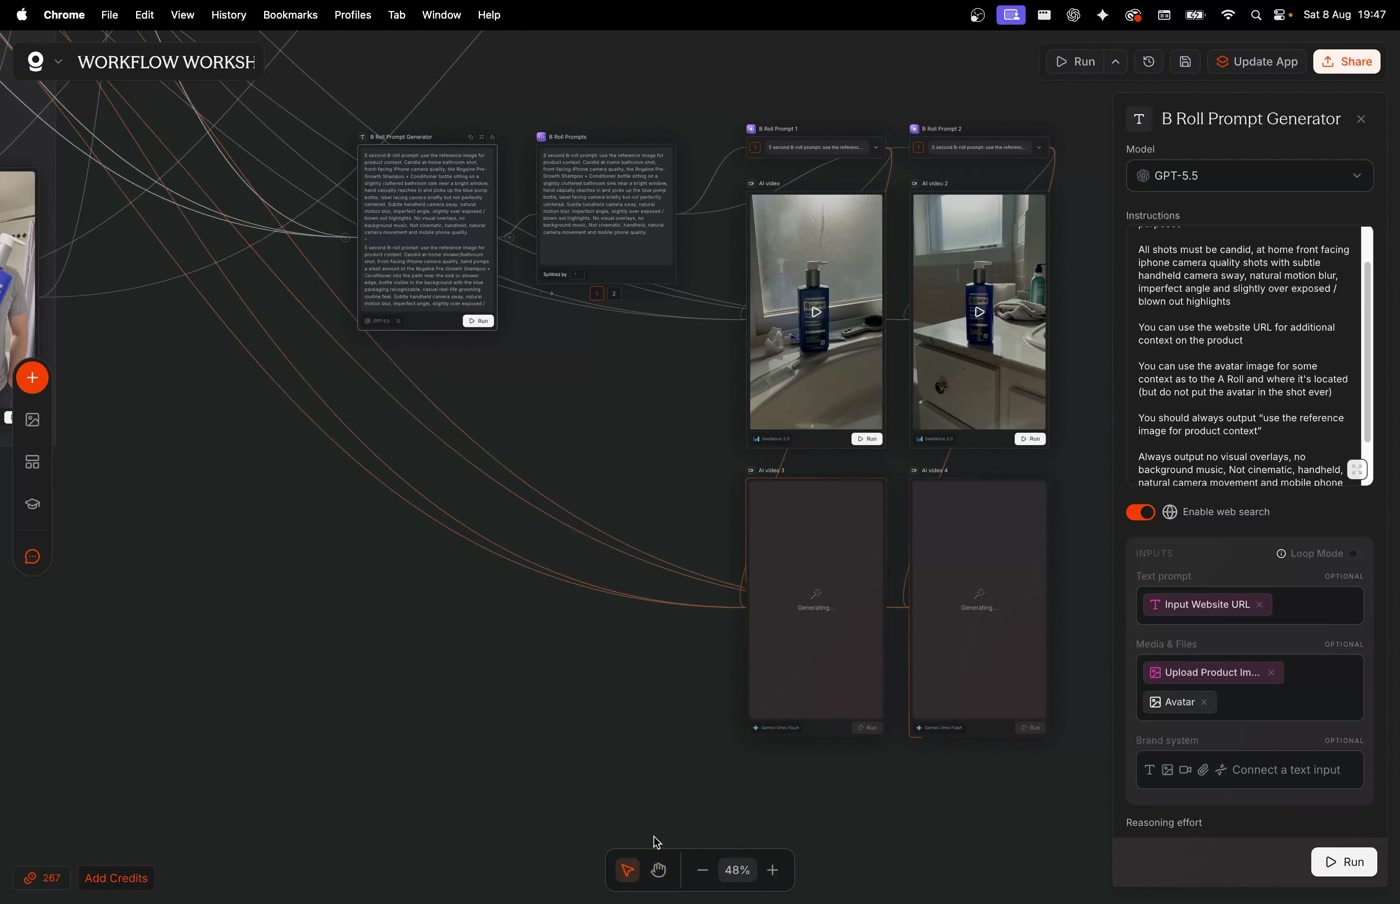
The shots have different jobs and the product still looks like the real one.
Make a quick review edit, then finish the good version in an editor.
This step is optional. I would not recommend using Pletor's Merge Videos for the final advert. It is useful for checking the three A-roll clips as one performance, but the best results come from downloading the clips and cutting them tightly in a proper editor.
If you want a quick review copy, add Merge Videos and connect A-Roll 1, 2 and 3 in order. Start with clean cuts. I tested fades and slides during the recording, and the transition created a black frame that advertised the edit instead of hiding it. A tiny zoom can work. A bad transition is worse than no transition.
You can connect Merge Videos to Zapcap Subtitles to see a rough captioned version. Keep the words around the bottom-middle of the frame, but not so low that TikTok or Instagram covers them. The right edge is dangerous too because that is where the platform buttons live.
For the finished edit, place the B-roll deliberately and control every cut. If you want a faster caption pass, I use Submagic. It is built for short-form captions and finishing, and I prefer it to forcing the final edit through Pletor. CapCut is another option if you already use it. The Google Drive output failed during my recording, so I would not build the process around that connection until you have tested it yourself.
Download the original clips for the final edit. Tight cuts and deliberate B-roll placement still need editorial judgement.
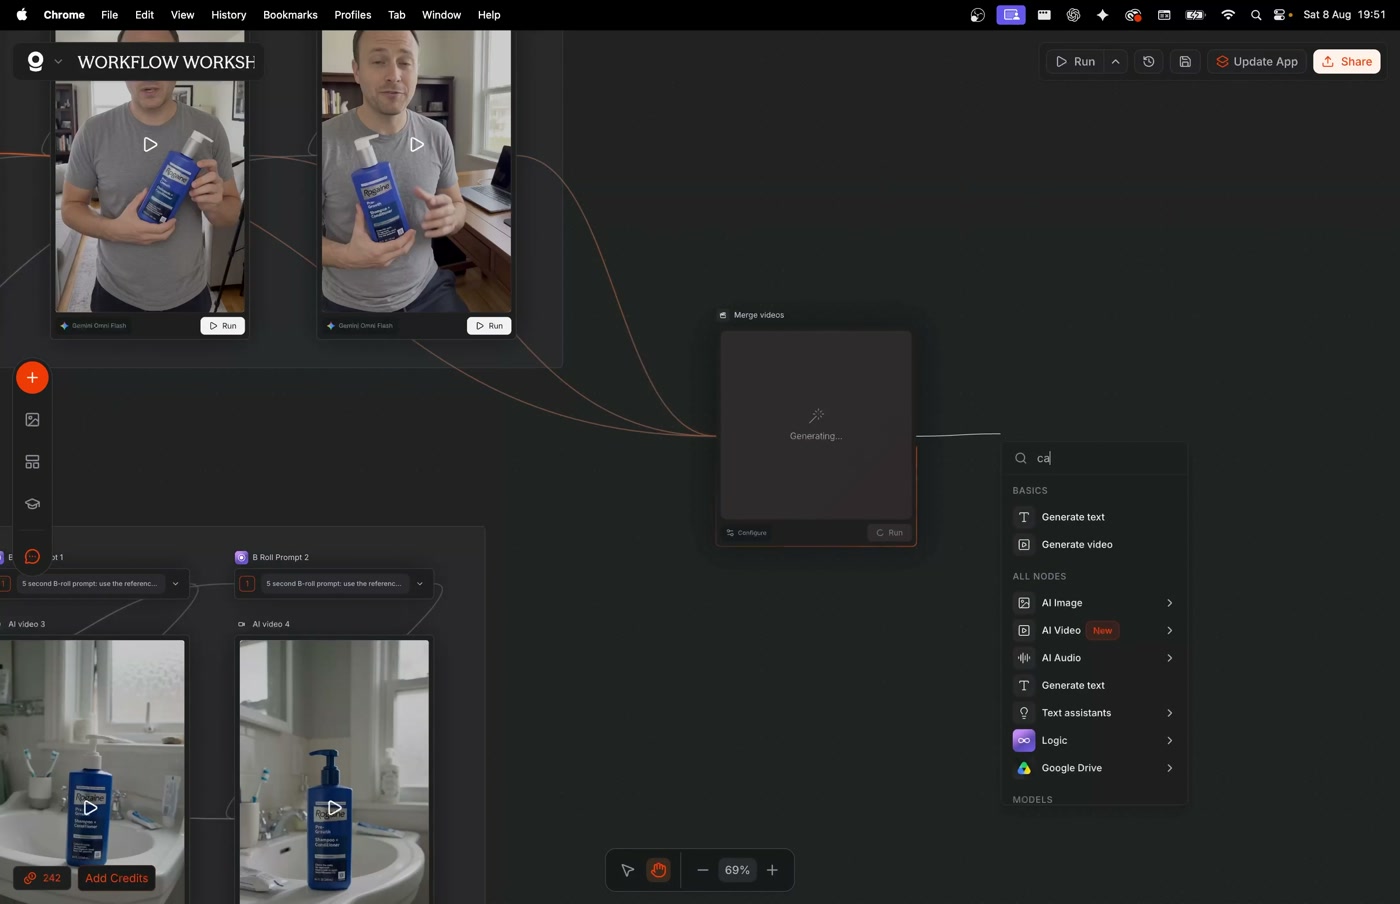
The story makes sense, cuts are clean and captions are clear of platform controls.
Swap in a second product without rebuilding the connections.
Until now, you have proved that the Rogaine example works. The final test is brutally simple: replace the website URL and product image without touching the routing.
I swapped in a Boots page for Clinique moisturiser and a clean product image. The same workflow chose a plausible female customer, created three rooms, kept the moisturiser in her hands, wrote a new 30-second script, generated A-roll and B-roll, then produced a merged version with captions.
That does not mean you should hit Run and walk away. Release the cheaper stages first. Read the customer choice, approve the avatar and compare all three starting frames. Then test one A-roll and one B-roll branch before you spend credits on everything else. A reusable workflow still needs quality control. It simply gives you one clear place to fix the problem.
Once a second product can travel through the same connections, you no longer have an elaborate one-product demo. You have a machine you can adapt for more products, more hooks, different placements or an eventual software interface.
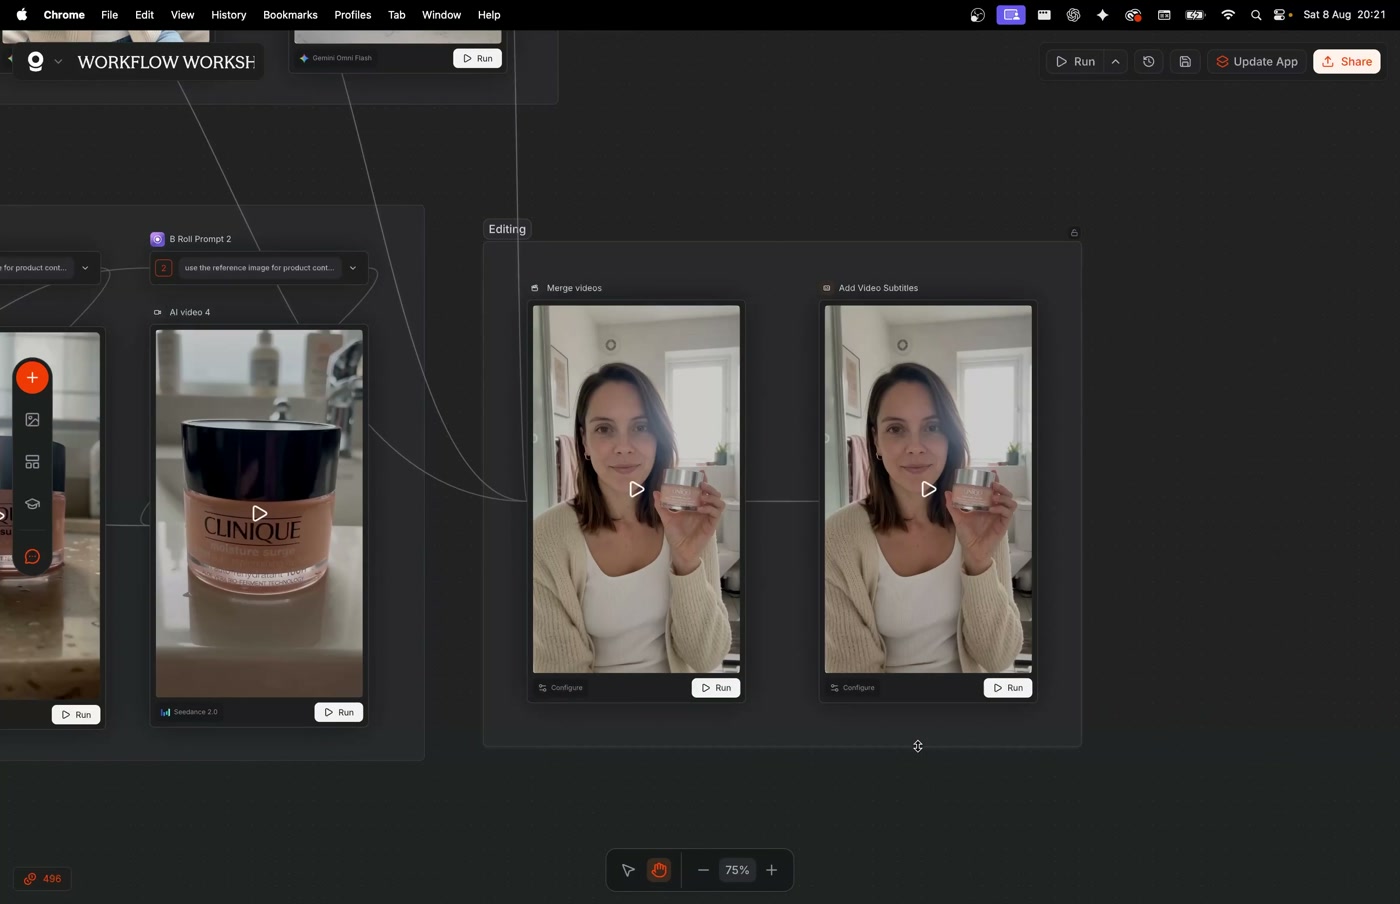
The new product reaches the final outputs after the same approval checks.
The workflow above is the lesson. If you want to compare platforms and generation costs, use this Workshop snapshot as a starting point and check live prices before you buy credits.
| Platform | Seedance 2 10 sec · 720p | Gemini Omni Flash 10 sec · 720p | GPT Image 2 | Nano Banana Pro |
|---|---|---|---|---|
| Figma WeaveStarter monthly · $24 · 1,500 credits | 254 credits about $4.06 | 125 credits about $2.00 | 9 credits about $0.14 | 9 credits about $0.14 |
| PletorStarter monthly · $19 · 1,000 credits | 190 credits about $3.61 | 100 credits about $1.90 | 15 credits about $0.29 | 5 credits about $0.10 |
| Pletor with discountStarter monthly · $15.20 · 1,000 credits | 190 credits about $2.89 | 100 credits about $1.52 | 15 credits about $0.23 | 5 credits about $0.08 |
| Higgsfield CanvasPro monthly · $29 · 600 credits | 45 credits about $2.1860 normally · $2.90 | 30 credits about $1.45 | 3 credits about $0.15 | 2 credits about $0.10 |
| Magnific SpacesPremium monthly · $17 · 20,000 credits | 2,800 credits about $2.38 | 2,500 credits about $2.13 | 50 credits about $0.04 | 50 credits about $0.04 |
Read the cash figure, not the raw credit number. Every platform values credits differently. This Workshop snapshot was checked 16 August 2026; live prices can move.
20% off Pletor for 12 months. This is an affiliate link, so I may receive a commission if you use it.
Open the 20% linkA bad final result usually began several nodes earlier. Do not rerun the whole workflow and hope. Work backwards until you find the first output that stopped being usable, fix it, then let the corrected result travel forward.
This is where Pletor's AI helper is genuinely useful. Select the problem node, explain what the output is doing wrong and ask it to inspect the prompt, inputs, model and settings. Before you let it change anything, duplicate the working node or copy every working prompt into your notes. AI can fix one problem and quietly remove a line that was protecting something else.
Paste the URL as raw plain text. Use Ctrl + Shift + V on Windows or Command + Shift + V on Mac.
Reconnect the original Product Image to that generation. If the product is far away in one frame and close in the next, the earlier frame does not contain enough label detail.
Feed Starting Frame 1 into Frame 2. Feed Frames 1 and 2 into Frame 3. Keep the original Product Image connected as well.
Use Split Text followed by separate numbered List Selectors. Do not connect the unsorted list directly to every video node.
Choose the accent once inside Script Generator and include the exact same instruction in all three output sections.
Shorten the spoken section or compare the exact same frame and prompt in another model. Keep the workflow; swap the model node.
Rename every node by its job and number. Inspect the input names on the selected node instead of tracing lines across the canvas.
If you have made it this far, I hope you can see the power of AI workflows. You now know how to take inputs, pass them through text, image and video models, split the results, route each piece and check the output before it becomes somebody else's problem.
You can use that knowledge for your own business or for clients. You can create internal tools, creative machines and eventually real products people pay to use. AI SaaS is a lot less mysterious once you realise that most of it is a useful workflow behind a clean interface.
The example is finished. The useful part is what you build next.
This course builds creative workflows for you or your clients. But let us say you spot a repeated business problem and want to charge customers for the convenience, like MakeUGC or Calico. You can use Codex or Claude to help you turn the proven workflow into an actual app.
I did this myself. I built an app for ecommerce stores where you upload a product image and receive multi-cut product videos. The app worked. I just could not sell it profitably on Facebook. That is worth saying because building the product and finding a profitable way to acquire customers are two different problems.
Start inside Pletor while the finished workflow is open. Copy the prompt below into Pletor AI. It asks for the exact prompts, settings and connections a developer needs, not a vague summary of what the workflow does.
Inspect the complete workflow currently open in this Pletor canvas and create an implementation-ready handoff document for a developer who has never seen it.

The goal is to rebuild this proven workflow as a customer-facing web app using:
- Next.js with TypeScript for the interface and server routes
- Supabase for authentication, database records and file storage
- Stripe for subscriptions, credit packs or usage-based billing
- FAL API for image and video model calls
- Vercel for hosting

Do not give me a high-level summary. Inspect the actual workflow and capture enough detail for Codex or Claude to reproduce its behaviour without opening Pletor.

Use the exact node names from the canvas. Do not invent missing settings, prompts, model names, connections or API endpoints. If something cannot be inspected, write "NEEDS MANUAL CONFIRMATION" and explain exactly what is missing.

Return the handoff in this order:

1. PRODUCT GOAL
Explain in plain English what the workflow allows a customer to submit, what it generates and what the finished app must return.

2. CUSTOMER JOURNEY
Describe the complete user journey from account creation and payment through input upload, generation progress, approval stages, final delivery and download.

3. GLOBAL INPUTS
List every user-controlled input. For each one include:
- exact name
- data type
- required or optional
- accepted file type, character limit or validation rule
- example value
- which nodes receive it

4. GLOBAL OUTPUTS
List every output the customer should see or download. Include the file type, aspect ratio, resolution, duration and which node creates it where available.

5. COMPLETE NODE INVENTORY
Document every node in execution order. For every node include:
- exact node name
- node type and purpose
- model and provider
- every model setting, including aspect ratio, resolution, duration, quality, mode, seed and number of runs where present
- web search or other tools enabled
- every incoming input and the node it comes from
- the full prompt or instruction copied verbatim, without shortening or paraphrasing it
- expected output and output format
- every downstream node that receives the output
- approval requirement, retry rule or fallback behaviour

6. CONNECTION TABLE
Create one row for every wire on the canvas using this format:
FROM NODE | FROM OUTPUT | TO NODE | TO INPUT FIELD | PURPOSE

Include all branches, duplicated nodes, image references and direct input connections. Make Split Text and List Selector routing explicit. Record the delimiter, list item number and matching starting frame for every branch.

7. EXECUTION ORDER AND APPROVAL GATES
Write the exact order in which the workflow must run. Identify which nodes can run in parallel, which must wait for an earlier result and every point where a person must approve an output before the next expensive generation begins.

8. APP STATE AND PROGRESS
List the statuses the app should store and show to the customer, including queued, generating, ready for review, approved, retrying, failed and complete. Explain which node or group each status applies to.

9. DATA AND FILE LIFECYCLE
Explain which URLs, prompts, images, videos, model responses and approval decisions must be stored. State which files are temporary and which must remain available in the customer's account.

10. API IMPLEMENTATION NOTES
For each AI node, identify the matching FAL model endpoint if you can confirm it. If you cannot confirm an endpoint, provide the exact Pletor model name and mark the endpoint as NEEDS MANUAL CONFIRMATION. Include the expected request fields, response fields, asynchronous queue behaviour and webhook result the app needs to handle.

11. FAILURE AND RETRY RULES
List likely failure cases, including invalid URLs, missing uploads, unsafe or blocked generations, unreadable product labels, character drift, timeouts and failed webhooks. Explain what can be retried safely and what requires the customer to change an input.

12. ACCEPTANCE TESTS
Write a practical test checklist proving that the new app matches this workflow. Include a full second-product test where the website URL and product image change but the routing stays the same.

13. BUILD MANIFEST
Finish with a structured JSON manifest containing:
- workflow name and goal
- global inputs and outputs
- nodes
- exact prompts
- models and settings
- connections
- execution dependencies
- approval gates
- stored assets
- unresolved items

The JSON must contain the same information as the written handoff and must be valid enough for a coding agent to parse. Do not include API keys, passwords or private credentials.

Before finishing, audit your own answer against the canvas. Confirm that every visible node appears in the inventory and every visible connection appears in the connection table.
The customer interface, upload flow, account area and server routes.
User accounts, database records and storage for product images and finished videos.
Subscriptions, credit packs or usage-based billing.
Image and video model calls, asynchronous queues, status checks and webhooks.
Hosting and deployment for the Next.js app.
The prompts, model settings and routing that make the app do the right thing.
Calling the generation models through FAL's API can remove the workflow-platform markup, so each output can be much cheaper. You are taking the process you already proved visually and paying for the underlying generation instead of the visual canvas around it.
You now know how this works. That does not mean you have to wire it together yourself.
If you would rather send me the product, the goal and a few reference ads, I can map the process, build the workflow and test each branch around what your business or client actually needs.
You still get the benefit of understanding the machine. You just skip the hours spent naming nodes, tracing connections, testing prompts and finding the first place an output went wrong.
Ask Ryan About a DFY Build